On the other hand, my house is clean and I'm purging. Hmmmm... just might have to get to my craft room soon and see what comes up as some candy for someone! Actually, I do have a pile going already, but I'm sure there's more. I need to make room for new : D
Have you been wanting to create some simple backgrounds for your projects, but don't really know where to start? Or maybe you're thinking it's too much work. Well, I have some good news for you. Read on...
Today's project is a canvas ATC. I've used a very simple, but effective technique for my background!
Before we get to the background, let's talk about this great MONSTER!!! This image is Some Days from the Oddly Sweet Curiosities Collection by Susana Loves Stamps. These NEW (and SCACD exclusive) monster images are growing on me for sure! They are fresh and fun!!!
If you wanted the monster without the man on the end of the hook, it would be very easy to cut him off or even if you covered him up with a post it note on your stamp before inking, then remove the post it note and stamp away!
Here's the sticky-backed canvas ATC. First off, I need to tell you that I used the sentiment that comes with another stamp (Those Days). It just felt right to use it here lol. The only other paper I used on this project is a piece of cardstock under the canvas. Of course I used my fave ScraPerfect Best Glue Ever to adhere the sentiment and image!!!
How To:
Supplies Used:
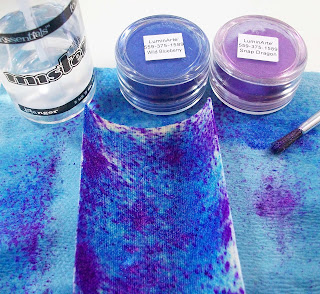
Mister (or Mini Mister) Spray Bottle
Wild Blueberry Mica Powder
Snap Dragon Mica Powder
Soft Brush
Sticky-backed Canvas ATC
Step 1: Cover your work surface according to the size of your project.
Step 2: Spray the canvas ATC with water.
Step 3: Using a soft brush, dip into the Wild Blueberry mica powder and tap it over the ATC. I just do this randomly...
Step 4: Repeat with Snap Dragon mica powder. Repeat colors/spray water until desired pattern is acheived.
Step 5: Allow to dry and embellish as desired.
*Note: I used a piece of Shop Towel on a Roll under the ATC, covered it with another piece of Shop Towel and put the container I have my mica powder in on top for weight. As you can see above, when wet, the ATC curls.
Here it is dry and adhered to a piece of cardstock, but it was already flat before I stuck in on : D
I did have a few problems which I'll tell you about. First, I didn't attach the ATC very straight. I think if I removed only a portion of the paper backing at the top, placed it on the cardstock and continued pulling the paper backing off while sticking the ATC down it would have turned out better.
Because it was wonky I wanted to straighten it out lol! So I tried my mini paper cutter. Don't bother with this! I'm not sure if it was the canvas or the combination of canvas with cs - in any case, it didn't work at all!
Next I tried using my chomper to round the corners. It did a partial job. I ended up using my scissors to finish. Oh well... good enough!
So all in all... my background was certainly the EASIEST thing to do on this project LOL! I hope that I've helped you avoid some pitfalls and frustrations : D
FREEBIE NEWS!
Have you received your FREE Butterfly Shaped Card file yet? You can find it HERE. There's also a Challenge with prizes!!! Ends August 15.
Next up: A Humorous Shaped Card. Stay Tuned!
May God bless you, keep you and comfort your soul~


6 comments:
What a gorgeous creation
\hugs Linda
This is fabulous xx
Wonderful tutorial! I have enjoyed visiting your blog and have added myself to your followers! Hugs!
Great technique Lori! Love the colors and look of your background and what a fun image! hugs, Angela
Gracias por tu técnica!!! hermoso color lograste en el canvas!!
This is so cool, love the colors and the little tutorial. You are going to love the copic classes. #1 is pretty much a repeat of everything you already know or have seen or heard on the internet, but take notes for #2, I am trying to encorporate a little here and a little there, lol. they were awesome. Enoy.
Post a Comment