Saturday, July 21, 2012

How to Create a Simple Canvas Background!

I am totally doing the happy dance today : D  : D  : D  Wanna join me?  I'd love for us to twirl around in our pretty little tutus LOL!  Oh my... what a horrendous picture I have in mind (not YOU, but MEEEEEE!!!).  I do think that I might break something as I'm not all that coordinated - not to mention your eyes... no I definitely would not put on a tutu and damage your precious eyes!  But I'm still jumping and twirling in my imaginary tutu as today I received my Vagabond.  YAY!!!!!  Can you tell that I'm just a little bit excited?  I haven't opened the package yet as I'm making myself take care of business first *sigh*

On the other hand, my house is clean and I'm purging.  Hmmmm... just might have to get to my craft room soon and see what comes up as some candy for someone!  Actually, I do have a pile going already, but I'm sure there's more.  I need to make room for new : D

Have you been wanting to create some simple backgrounds for your projects, but don't really know where to start?  Or maybe you're thinking it's too much work.  Well, I have some good news for you.  Read on...

Today's project is a canvas ATC.  I've used a very simple, but effective technique for my background!


Before we get to the background, let's talk about this great MONSTER!!!  This image is Some Days from the Oddly Sweet Curiosities Collection by Susana Loves Stamps.  These NEW (and SCACD exclusive) monster images are growing on me for sure!  They are fresh and fun!!!

If you wanted the monster without the man on the end of the hook, it would be very easy to cut him off or even if you covered him up with a post it note on your stamp before inking, then remove the post it note and stamp away!


Here's the sticky-backed canvas ATC.  First off, I need to tell you that I used the sentiment that comes with another stamp (Those Days).  It just felt right to use it here lol.  The only other paper I used on this project is a piece of cardstock under the canvas.  Of course I used my fave ScraPerfect Best Glue Ever to adhere the sentiment and image!!!

 How To:


Supplies Used:
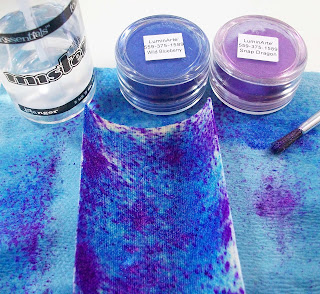
Mister (or Mini Mister) Spray Bottle
Wild Blueberry Mica Powder
Snap Dragon Mica Powder
Soft Brush
Sticky-backed Canvas ATC

Step 1:  Cover your work surface according to the size of your project.

Step 2:  Spray the canvas ATC with water.

Step 3:  Using a soft brush, dip into the Wild Blueberry mica powder and tap it over the ATC.  I just do this randomly...

Step 4:  Repeat with Snap Dragon mica powder.  Repeat colors/spray water until desired pattern is acheived.

Step 5:  Allow to dry and embellish as desired.

*Note:  I used a piece of Shop Towel on a Roll under the ATC, covered it with another piece of Shop Towel and put the container I have my mica powder in on top for weight.  As you can see above, when wet, the ATC curls.


Here it is dry and adhered to a piece of cardstock, but it was already flat before I stuck in on : D

I did have a few problems which I'll tell you about.  First, I didn't attach the ATC very straight.  I think if I removed only a portion of the paper backing at the top, placed it on the cardstock and continued pulling the paper backing off while sticking the ATC down it would have turned out better.

Because it was wonky I wanted to straighten it out lol!  So I tried my mini paper cutter.  Don't bother with this!  I'm not sure if it was the canvas or the combination of canvas with cs - in any case, it didn't work at all!

Next I tried using my chomper to round the corners.  It did a partial job.  I ended up using my scissors to finish.  Oh well... good enough!

So all in all... my background was certainly the EASIEST thing to do on this project LOL!  I hope that I've helped you avoid some pitfalls and frustrations : D


FREEBIE NEWS!
Have you received your FREE Butterfly Shaped Card file yet?  You can find it HERE.  There's also a Challenge with prizes!!! Ends August 15.


Next up:  A Humorous Shaped Card.  Stay Tuned!


May God bless you, keep you and comfort your soul~


Sunday, July 15, 2012

How to Create a Butterfly Card - Freebie and Challenge!

Challenge and Freebie Below...

It's me again... Can you believe it?  I've actually got another fun project to share with you today woot woot!!!  Not only will I share how I made this beautiful card, but I'm also giving you a FREEBIE *insert another woot!!!*

Although it took me a little while to figure out how to get the butterfly die cut into my computer so I could create a shaped card using THIS butterfly die, the rest was a breeze!

I've been trying to incorporate my Cameo into my card making more often.  I forgot to mention in my previous post HERE that I used the beach ball template I downloaded from Paper Crafts magazine to create the shaped card with my Cameo.  It probably would have been much faster if I just used scissors for this one, but I wanted to use my Cameo so the cut would be even.  Know what I mean?  Scissors and I aren't that compatible hee hee.

On to today's shaped card. Shown here from top to bottom:  Finn Butterfly die cut; butterfly cut file layer 1 (colored with Primary Elements Mica Powder); butterfly cut file layer 2 (embossed); butterfly cut file card base.


The top layer is the GORGEOUS butterfly die cut by Memory Box.  It is approximately 3.5" x 5"  This was my inspiration : D  I LOVE butterflies!!!


Here's a better shot of the beautiful shimmer and color of the mica powder (sorry for the ugly hand and background : (  I've also given the die cut a couple coats of Ice Silks Acrylic Glaze which made it lift up naturally - yay!

Here are the materials I used to create this card:

Step 1:  Open cut file with your cutting machine (adjust size as needed) and make all cuts.  Note which piece should be BLACK.

Step 2:  Using BLACK cut out (closest size to the die cut), 'stamp' entire surface with VersaMark pad.

Step 3:  Using mica powders and a soft brush, tap the mica powder over the VersaMark covered cardstock.  I simply dip my brush into the powder and gently tap the handle to create a splattered effect.  It's not a problem to use the same brush with each mica color if you are tapping it off each time...

Step 4:  Using a larger brush (only because it's easier) gently brush away excess powder to reveal your beautiful design!  You can rework, adding more colors until you are happy with the result.

Step 5:  Spray the mica colored card stock with Fixatif and lay aside to dry.

Step 6:  Die cut Finn Butterfly.  Since this is a large, intricate die, you may need to pass through your machine more than once (depending on your machine).  NOTE:  I've finally ordered the Vagabond!  I can NOT wait!!!!!  I am anxious to see how this die cuts with the powerhouse : D

Step 7:  Using Ice Silks Acrylic Glaze, cover the die cut with one or two coats and lay aside to dry.

Step 8:  You will now have one layer and the card base left.  Emboss the layer using More Dots embossing folder and score and fold card base.

Step 9:  Assemble layers using Best Glue Ever!  You only need small dots of this glue...  It's glue on steroids lol!

Step 10:  Embellish with rhinestones and sit back and enjoy your beautiful creation!

What colors or embellishments would you like to use on your butterfly card or project?  I would love to see what you come up with!  So... how about a...

***CHALLENGE ***

Using the Butterfly Shaped Card template/cut file (see below) with an additional entry if you also use Finn Butterfly... Let's see your creations!

Challenge will begin July 15 and end August 15.  This will give you LOTS of time to prepare and even order Finn Butterfly : )

What can you win?  Well... for starters, let's just say if you are a Magnolia or Tim Holtz fan, you'll be jumping up and down!!!

  • First Prize:  Ten new or very gently used Magnolia stamps (list to come)
  • Second Prize:  Tim Holtz tiny attacher with staples and assorted accessories
  • Third Prize:  Four Embossing folders and two stencils

So what do ya say?  Wanna play?  Enter your butterfly creation with Mr. Froggy below.  Please enter a direct link to your blog post, not your blog.  Please also link this blog in your challenge post.

Thanks... and have fun!

*Edited:  Some of you have mentioned that you don't have an electronic cutting machine.  Never fear!  If you download the PDF file, you will be able to print out and cut by hand :D
Here's your FREEBIE!!!
Download Cut File Here:

Available files are:  svg, pdf, mtc, studio, png.  After clicking on the above link, click on the file extension you want and then click download.  That's it!

If you have any questions, I'd be happy to help!  My email is listed on my sidebar.

Thanks for hanging in there with me : )  I know this was a long post!

May God bless you, keep you and comfort your soul~


Friday, July 13, 2012

Fun in the Sun!

Hello my friends!  I'm so glad that you've stopped by to see me :D  I do hope that you are not melting in your corner of the world lol!  It's been sooooo hot!  Lord knows that I don't do hot very well.  It seems the older I get, the crankier I become in the heat.  No... seriously!!!  Do you think it has anything to do with menopause?  On that subject, I don't even know if I'm in it or what!?!  Two years ago I had a complete hysterectomy but because I've also had breast cancer, I can't take hormones.  I must say though that the hot flashes are not as frequent.  Oh well, whining never helps - no one seems to listen LOL LOL LOL!

So with that off my chest, I'd love for you to see what I've created with one of the latest releases from The Little Sassy Crew by Susana Loves Stamps for SCACD.  This is Little Morticia!

Isn't she fun?  Her 'thing' is that she loves to be color coordinated... even her hair!

One day I noticed this fabulous beach ball from Maria's blog and saw that she used a template from Paper Crafts Magazine.  I loved it so much that I downloaded the template myself - this is my version : )

In this photo, I'm highlighting the Ice Silks Acrylic Glaze which I used to cover the skull 'button' and also streaks of Morticia's hair!  Silks are so shimmery, and if you add Mica Powder to them, the wow factor is off the charts!!!  Susana carries tons of yummy colors to choose from.  Yep, I'm working my way to collecting them all!  Can't have just a couple, I need ALL the colors lol!

One more thing... I've decided that I'm a much better zig zag sewer than a straight stitch sewer.  Food for thought...

Here are a few products I used on this card which are not mentioned above:

Sticky Strips (applied on the back of cut out image for dimension)
ScraPerfect Best Glue Ever (no kidding, this is on my MUST HAVE list)
Tuxedo Black Memento Ink Pad - used to stamp the image
Tim Holtz Paper Clip - which isn't in the store, but Susana does have a growing number of Tim Holtz products *Here*
Onyx Black VersaFine Ink Pad - I used this to stamp the sentiment on the ticket
Distress Tool - used to rough up the edges of the beach ball

I'm hoping to enter a few challenges which I will post here...

Next up is a butterfly card you won't want to miss!

Have a wonderful (and cooler!) weekend : D

May God bless you, keep you and comfort your soul~

the countdown...

Get your own free Blogoversary button!
Related Posts with Thumbnails